You recorded the course. The camera files are on your drive. The screen recordings are in another folder. Audio is named something useless like “final_take_NEW_reallyfinal.” Now the core work begins.
This is the point where many course creators realize that online course video editing isn't just cleanup. It's where teaching quality gets shaped after the shoot. A strong lesson can feel slow, repetitive, or amateur if the edit drags. An average lesson can become clear and watchable if the pacing, structure, sound, and visuals are handled well.
Most creators begin by trying to do everything themselves, and that's reasonable. You should understand the process before handing it off. But there's also a point where editing stops being a useful skill to practice and starts becoming a production bottleneck. The smartest path for many course businesses sits in the middle. Learn enough to record better, organize better, and give better direction. Then outsource the parts that eat your week.
Table of Contents
- Beyond the Record Button
- Recording and Pre-Production for an Easier Edit
- The Core Online Course Editing Workflow
- Technical Specs Branding and Motion Graphics
- Repurposing Lessons for Social Media Growth
- Working with an Online Course Video Editing Service
Beyond the Record Button
Editing changes the lesson, not just the footage
Creators often think editing means trimming mistakes, adding an intro, and exporting an MP4. That mindset overlooks the essential task. In course production, the edit controls how the student experiences the material. It controls rhythm, cognitive load, clarity, and whether the lesson feels guided or exhausting.
That matters because 73% of online course viewers drop off before finishing a lesson, according to the discussion and cited benchmark highlighted in this videography thread about the post-shoot editing psychology gap. The useful point isn't just the number. It's what most editing advice ignores. Tutorials teach buttons and menus. They rarely teach how to cut for attention.
A course edit has to do more than look clean. It has to remove drag. That usually means tightening transitions between ideas, trimming verbal ramps, reducing dead air, and using visual changes at the exact moment attention starts to soften.
Practical rule: If a sentence teaches one idea, the edit should help that idea land fast. If the viewer has to wait through throat-clearing, the course feels heavier than it is.
What students notice first
Students don't describe the experience in production language. They don't say, “the pacing lacked discipline” or “the audio floor was inconsistent.” They say the lesson felt hard to get through. They say it felt low quality. They stop trusting the course, even when the information is good.
Three editing choices usually shape that reaction:
- Pacing: Slow starts, repeated points, and long pauses make even strong teaching feel uncertain.
- Audio consistency: If one section is louder, thinner, or noisier than the next, students notice immediately.
- Visual reinforcement: A talking head with no on-screen support gets tiring fast, especially when the concept is abstract.
The psychology gap finds practical application. Good editors aren't just operating Premiere Pro, Final Cut Pro, or DaVinci Resolve; they're deciding when to stay on camera, when to cut to slides, when to add text, and when silence should be shortened so the lesson keeps moving.
The best educational edits feel invisible. Students don't admire the timeline. They keep watching.
That difference is why raw footage rarely becomes a strong course on its own. Recording creates the material. Editing creates the learning experience.
Recording and Pre-Production for an Easier Edit
Record for the timeline you want later
A painful edit usually starts with a careless shoot. If you record long, wandering takes and assume you'll “fix it in post,” post becomes the place where your time disappears.
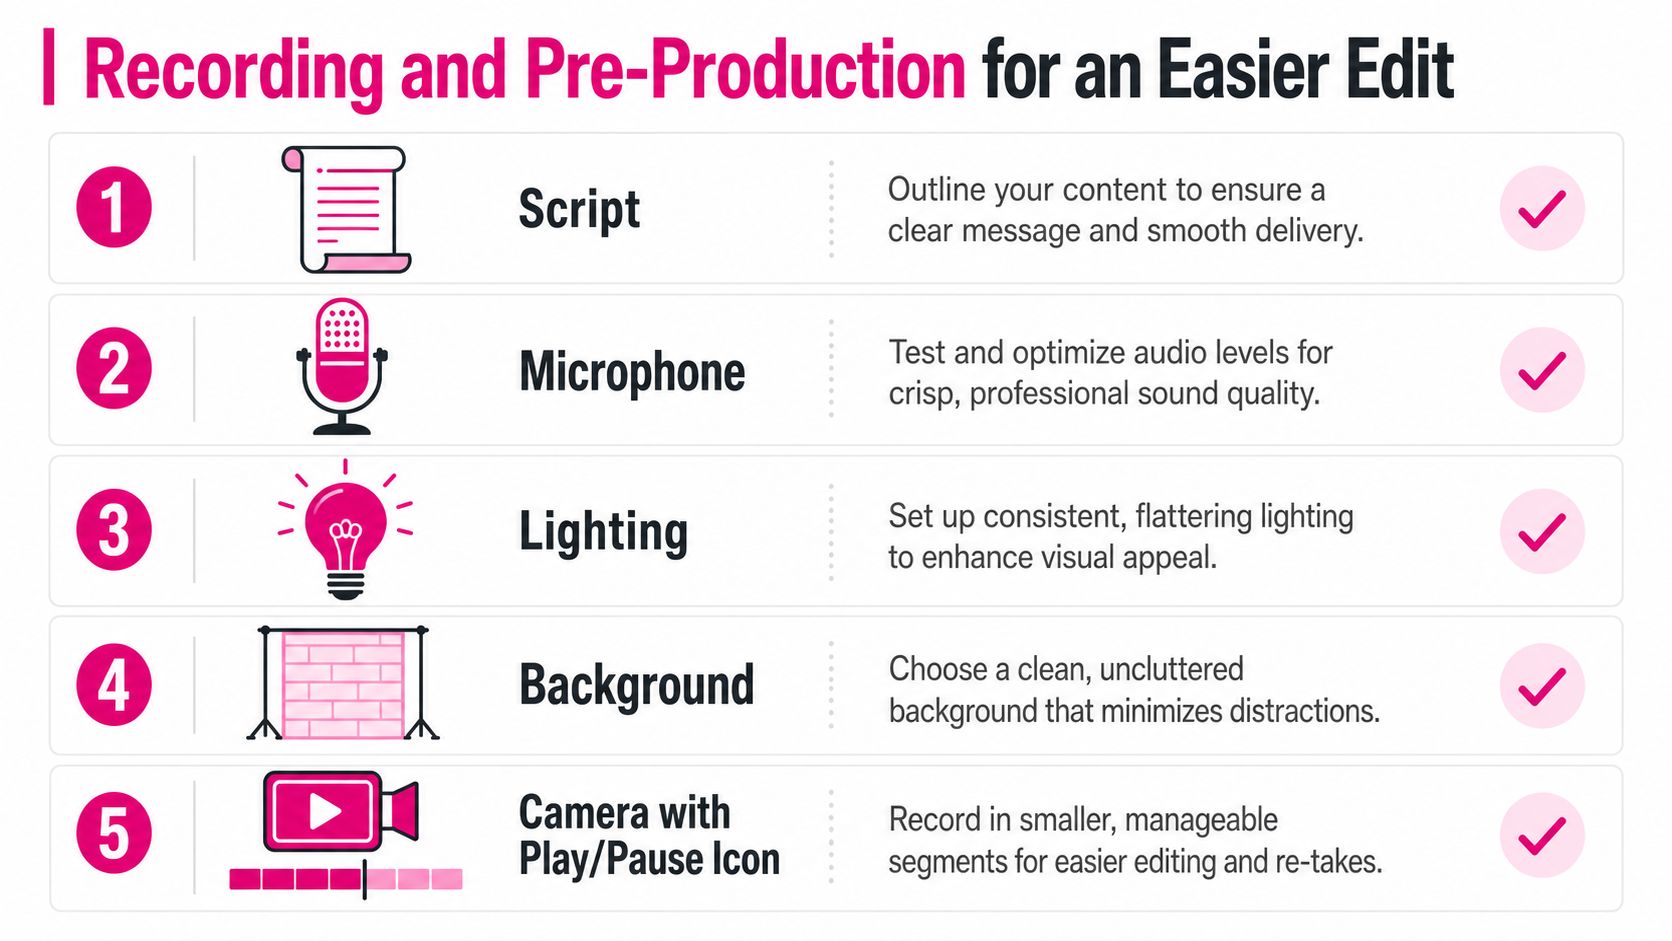
The easiest fix is to record in small, logical lesson chunks. Think in modules, not marathon takes. If a lesson covers three concepts, record three clean segments. That gives you cleaner retakes, easier updates later, and less hunting through an hour-long file for one sentence you need to replace.
If you're recording separate camera and microphone tracks, add a hand clap at the start of each take. It's simple, and it saves time when syncing. If you need a refresher on the workflow, this guide on how to sync audio with video covers the practical setup.
Simple production choices that save hours
You don't need a film set. You do need consistency.
Here are the production decisions that make the edit faster and cleaner:
- Use one lighting setup for the whole module. If your key light changes between lessons, color correction becomes a repair job.
- Test microphone placement before you teach. Good audio at capture is easier than trying to rescue echo, plosives, or room noise later.
- Choose a stable background. Busy shelves, bright windows, and random objects create distractions that the editor cannot entirely remove.
- Keep framing repeatable. If your camera height and crop shift between sessions, the course loses continuity.
- Pause and restart after mistakes. Don't apologize mid-sentence and keep rambling. Stop, take a breath, and begin the sentence again. That makes the cut obvious in the timeline.
A lot of DIY creators waste hours because they record while making live decisions. They improvise structure, adjust gear on the fly, and speak until they find the point. That's workable for casual content. It's inefficient for educational content.
Build a handoff-ready folder structure
Even if you plan to edit everything yourself, organize like someone else will touch the project tomorrow. That discipline pays off whether you're working solo or sending footage to an editor.
A simple structure works well:
| Folder | What goes inside | Why it matters |
|---|---|---|
| 01 Camera | A-roll, talking head footage | Keeps primary teaching footage easy to find |
| 02 Audio | External mic recordings, backups | Helps sync and audio cleanup |
| 03 Slides | Deck exports, PDFs, visuals | Makes cutaways and overlays faster |
| 04 Assets | Logo, fonts, music, lower-thirds | Prevents repeated asset hunting |
| 05 Exports | Review drafts and finals | Keeps approvals separate from raw media |
Name files by lesson and take, not by mood. “Module-02-Lesson-03-Take-2” is useful. “final_final_use_this_one” is not.
If you think outsourcing might happen later, prepare for it now. Clean folders, clear filenames, and simple notes can cut revision friction dramatically.
The creators who work well with editors usually aren't more technical. They're more organized before post begins.
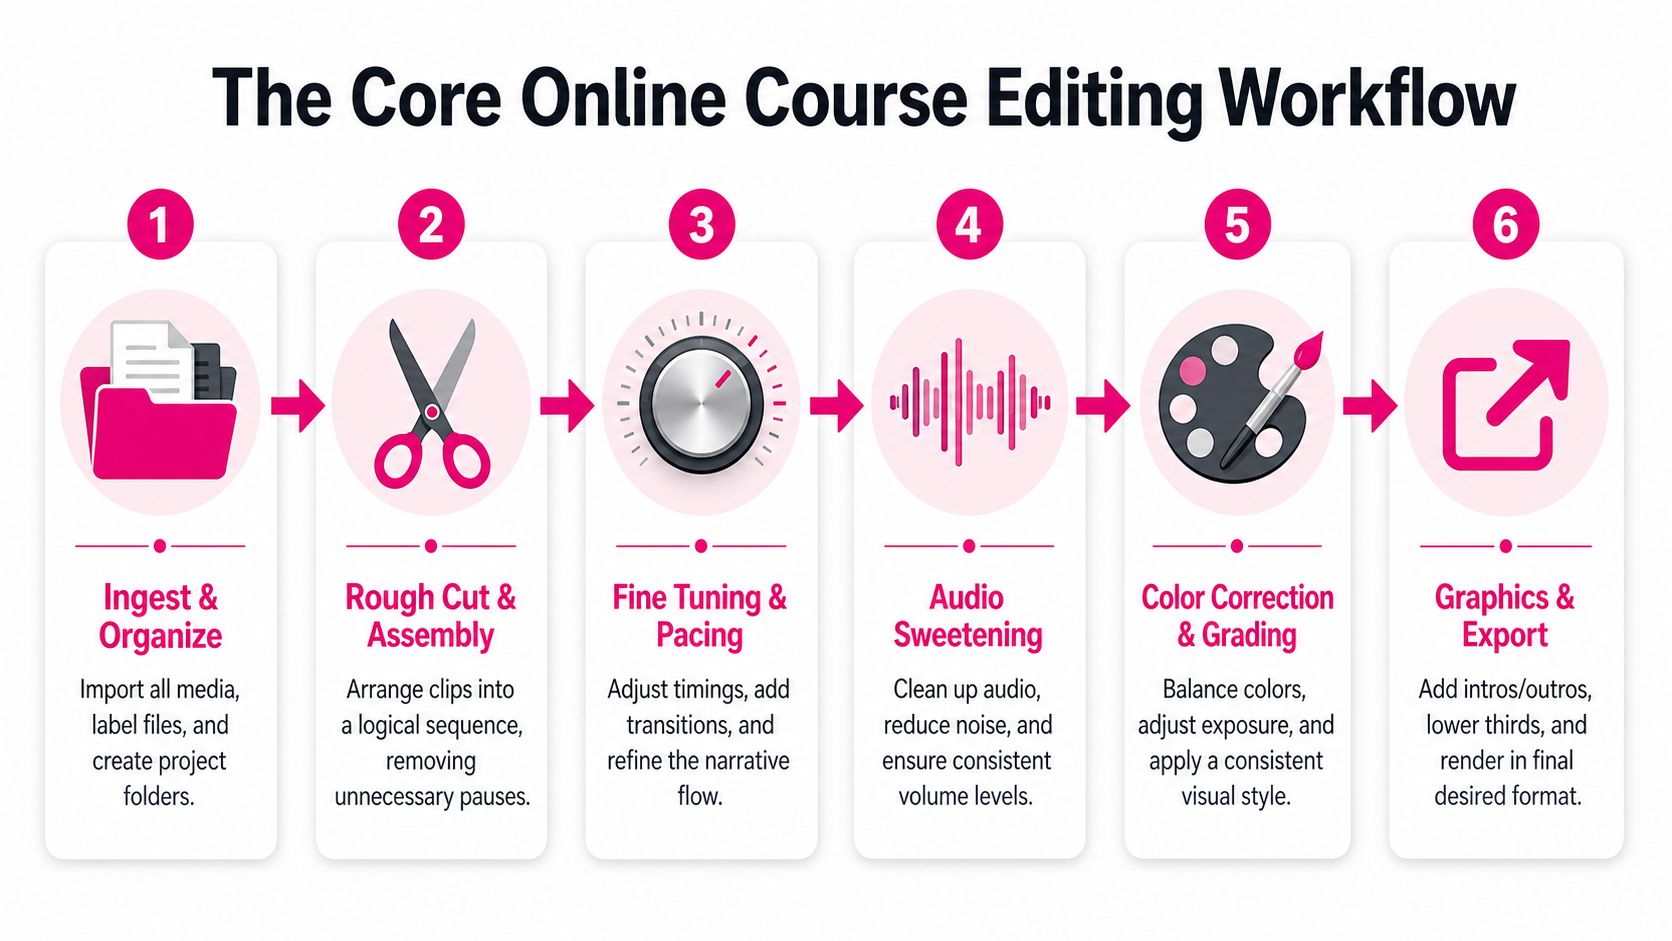
The Core Online Course Editing Workflow
A course edit goes smoother when you stop trying to perfect everything at once. Professional workflows separate the job into passes. That prevents the common beginner problem of tweaking transitions before the lesson structure is even right.
Early in the process, this workflow view helps keep the project grounded:
Start with assembly, not polish
The first pass is the assembly cut. You're not fixing color yet. You're not animating titles. You're putting the lesson in the right order and making sure the structure teaches cleanly.
That usually means:
- placing the best takes on the timeline
- inserting slides or screen recordings where they support the explanation
- removing false starts and obvious mistakes
- checking whether the lesson flows from one concept to the next
Many creators notice a recording problem that wasn't obvious during filming. A section may be accurate but repetitive. Another may jump too quickly because the explanation only made sense in the room when you were teaching it.
Watch the assembly as a student, not as the instructor who already knows the material.
Later in the workflow, you'll get more precise. For now, logic beats polish.
A helpful visual example of educational editing rhythm is below:
Airtighting is where retention improves
Once the structure works, do the most important pass in online course video editing. Airtighting.
Industry benchmarks summarized in this guide to course editing and retention recommend removing pauses and redundancies aggressively, and keeping focused teaching segments in the 5 to 8 minute range because longer stretches often lead to stronger drop-off. The same source also identifies inconsistent audio levels as a major failure point.
Airtighting isn't just cutting silence. It's cutting hesitation, repeated setup language, and verbal clutter that slows comprehension.
Here's what usually gets removed:
- Lead-ins that don't teach anything such as “So, what we're going to do here is…”
- Duplicate explanations caused by recording uncertainty
- Search phrases where the instructor is finding the wording in real time
- Dead transitions between camera and screen content
What usually stays:
- a short pause before an important point
- brief personality moments that make the instructor feel human
- natural breathing room after a dense concept
Leave enough space for the student to process. Remove the space where the instructor is still thinking.
Finish with technical passes
After the lesson is tight, move through the finishing passes one at a time.
Audio pass
Listen on headphones. Then listen on speakers. Fix background noise, hum, and uneven levels. A course can survive imperfect lighting more easily than it can survive irritating audio.
Pay attention to transitions between clips. If the room tone shifts abruptly, students hear the edit immediately.
Color pass
Match exposure, white balance, and skin tone across the module. Educational content doesn't need dramatic grading. It needs consistency. If one lesson is cool and dim while the next is warm and bright, the course feels patched together.
Graphics pass
Add only the graphics that help instruction. Titles, lesson names, lower-thirds, callouts, and occasional emphasis text are useful. Decorative motion for its own sake isn't.
A clean workflow often looks like this:
| Pass | Main question | Common mistake |
|---|---|---|
| Assembly | Is the lesson in the right order? | Polishing clips before structure is set |
| Airtight | Does the lesson move without drag? | Leaving pauses because they felt natural while recording |
| Audio | Can students listen comfortably the whole time? | Ignoring level jumps between takes |
| Color | Do all clips belong to the same course? | Over-grading instead of matching |
| Graphics | Do visuals clarify the teaching? | Adding too many branded elements |
That sequence sounds methodical because it is. Good editing gets faster when the process is boring in the right way.
Technical Specs Branding and Motion Graphics
Use one export standard across the course
A course doesn't need exotic delivery settings. It needs reliable playback and consistency from lesson to lesson.
The practical standard is 1920×1080 resolution, 30fps, H.264 video, AAC audio, MP4 container, and a bitrate between 4 and 10 Mbps, as recommended in this walkthrough on optimal online course export settings. Those settings balance image quality with streaming efficiency and broad device compatibility.
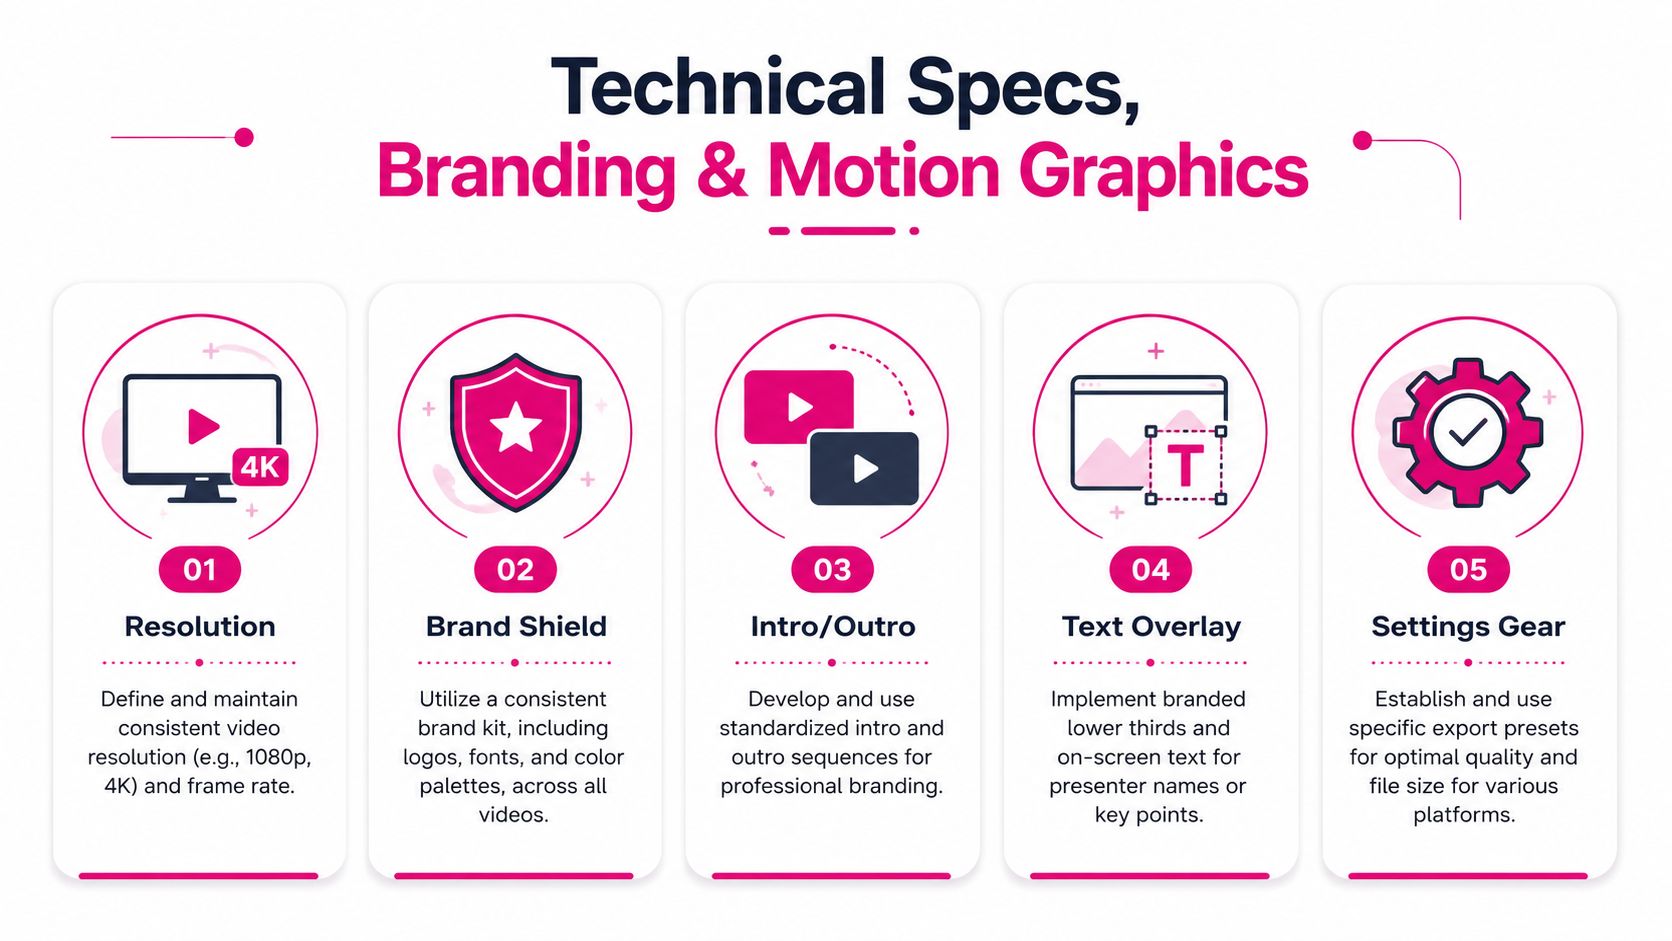
What matters most is standardization. If one lesson exports at a different frame rate, another has softer text, and a third is compressed too heavily, students won't describe the issue technically. They'll just feel inconsistency.
A useful export checklist:
- Resolution: Keep the full course at 1080p unless a platform requires something else.
- Frame rate: Stay at 30fps if that's how the course is built.
- Codec and container: H.264 in MP4 remains the safe default.
- Bitrate: Stay within the recommended range so files don't become unnecessarily heavy.
- Audio: Export clean AAC audio and check the final file, not just the timeline.
Branding should support comprehension
Branding assets are often treated like decoration. In educational content, they work better as navigation tools.
A lower-third can introduce the speaker or define a term. A title card can tell the student they've entered a new lesson. On-screen labels can clarify a framework before the instructor starts unpacking it. That's useful branding because it also improves comprehension.
Motion graphics work the same way. The best course graphics do one of three jobs:
- orient the learner
- reinforce a key point
- simplify something abstract
If an animation doesn't do one of those, it's probably adding noise.
For creators building a more polished visual package, professional motion graphics and animation services can help create branded assets that stay consistent across an entire library of lessons. The core value isn't flashy movement. It's repeatable visual language.
A course feels premium when every visual element looks intentional. That doesn't mean complex. It means consistent.
Keep intros short. Keep outros functional. Use fonts that remain readable on laptops and phones. Avoid stuffing the frame with logos, badges, and moving text. Students bought the course to learn, not to watch a brand reel.
Repurposing Lessons for Social Media Growth
Why every course needs a clip strategy
If you're producing a course and not cutting short-form clips from it, you're leaving discoverability on the table.
Short-form video production grew by 52% in 2024 and accounts for 38% of all video created, according to these video editing statistics on short-form growth. The same source projects that by 2025, videos under one minute will make up about 80% of online video content. For course creators, that changes the job. Long-form lessons are the product. Short-form edits are part of the distribution system.
That doesn't mean every clip needs to dance for attention. It does mean each lesson should produce a set of usable promotional moments.
What to cut from a lesson
The best clips usually come from one of these moments:
- A strong hook: the sentence that names the problem sharply
- An aha moment: where a confusing concept suddenly becomes simple
- A common mistake: especially if the correction is quick and actionable
- A framework fragment: one step from a larger process that stands alone
Edit those clips for the platform, not for the course player. Reframe to vertical. Add burned-in captions because many people watch without sound. Start tighter than feels comfortable. Get to the point in the first line.
A simple repurposing workflow works well:
| Clip type | What to look for in the lesson | Best use |
|---|---|---|
| Hook clip | Problem statement or contrarian insight | Social discovery |
| Tip clip | One actionable takeaway | Reels, Shorts, TikTok |
| Proof clip | Clear explanation with authority | Trust building |
| Teaser clip | Partial answer that invites the full lesson | Drive viewers back to course or YouTube |
The mistake is lifting a random minute from the course and calling it a short. Good repurposing is editorial. You reshape the lesson beat for a different audience, a different frame, and a different attention pattern.
Working with an Online Course Video Editing Service
When DIY stops making business sense
DIY editing makes sense early. You learn what footage needs, how long a lesson really takes to finish, and where your own recording habits create problems. But there comes a point where editing every lesson yourself starts competing with higher-value work like teaching, sales, curriculum updates, and audience growth.
That decision isn't only about convenience. It's also about output quality and consistency. Professional online course editing typically costs $500 to $2,000 per course, based on this review of online course creation industry statistics. That range reflects the actual complexity of turning raw lectures into finished educational content.
The low end usually fits straightforward edits. The upper end tends to involve more moving parts, such as multi-camera work, audio cleanup, graphics, repurposed shorts, thumbnails, and packaging that supports distribution after the course is published.
How to hand off footage without losing control
Outsourcing fails when the creator sends a pile of files and vague hopes. It works when the handoff is organized.
An editor needs:
- a clear folder structure
- lesson order
- brand assets
- examples of the style you want
- notes on what matters most
Feedback also needs to be precise. “Can we make this part better?” creates a messy revision round. “At 03:12, cut the repeated example and bring the slide in earlier” is usable.
If you're evaluating providers, it helps to review the process they use to hire a video editor and how revisions, communication, and asset delivery are handled. Workflow matters as much as editing skill.
The best outsourcing relationships don't remove your voice. They remove production drag.
What good outsourcing actually looks like
A good editing service doesn't just send back a prettier file. It gives you a repeatable production system.
Compare the two approaches:
| DIY only | Service-supported workflow |
|---|---|
| You record, edit, review, revise, export | You record and direct, then review structured drafts |
| Quality varies with your available time | Quality is easier to standardize across lessons |
| Publishing slows when your schedule gets crowded | Post-production can continue while you work elsewhere |
| Revisions happen inside scattered messages and notes | Revisions work best when timestamped and tracked |
The best arrangement isn't always full handoff. Some creators keep rough cuts in-house and outsource finishing. Others outsource long-form lessons but keep social clips internal. Others do the opposite.
What's smart is choosing intentionally. If editing is slowing the business down, that isn't a badge of honor. It's a production constraint.
If your course footage is piling up and post-production is becoming the bottleneck, Your Video Editor offers a practical way to hand off the editing without losing control of the final product. Their team handles long-form and short-form edits, graphics, thumbnails, and revision workflows built around timestamped feedback, which is exactly what course creators need when consistency and turnaround matter.