Most advice gets TikTok video ratio wrong because it treats 9:16 like a sticker you slap on at export. That's too late. By the time you're choosing a canvas, the ratio has already shaped framing, caption space, subtitle safety, and whether a clip feels native or cramped on mobile.
The better way to think about it is simple: TikTok video ratio is a distribution decision. It tells you how to shoot, how to frame, how to crop, and which source format gives you enough room to repurpose later. A vertical cut, a square cut, and a horizontal cut all solve different problems, and the right one depends on the content, the duration, and whether the same footage needs to live on Reels or Shorts too.
Table of Contents
- Why TikTok Video Ratio Is More Than a Number
- Aspect Ratio and Resolution Explained Simply
- Comparing 9:16, 1:1, and 16:9 for TikTok
- Safe Zones, UI Overlays, and Where to Place Text
- Export Settings Editors Actually Need
- Shoot in 4K, Edit in 9:16, Export for Every Platform
- Common Ratio Mistakes and How to Fix Them
- Pre-Export Checklist and Final Takeaways
Why TikTok Video Ratio Is More Than a Number
TikTok isn't just a vertical-only app anymore, but 9:16 is still the format that fills the screen and feels native in the feed. The widely used export target is 1080 × 1920 pixels, and anything outside that shape risks black bars or cropping. That's not an abstract spec issue, it changes how a viewer experiences the first second of the clip.
Practical rule: if the frame shape fights the platform, the platform wins.
The mistake is thinking ratio is only a technical setting. In practice, it's part of the edit decision tree. A clip built for under-a-minute scrolling behaves differently from an interview cut or an educational segment that's meant to be watched with more patience.
That's why modern editing workflows treat ratio as a distribution rule. Short-form, long-form, and cross-posted content don't all deserve the same canvas. A video can be perfectly composed in one shape and still underperform if it arrives on TikTok in the wrong one.
A lot of creators now build from a master and then decide where the footage should go. That's a much saner approach than locking yourself into one delivery format too early. It gives you room to reframe, protect text placement, and decide whether a clip belongs in a short vertical post or a longer horizontal upload.
If you want a broader platform comparison, the Aicut's TikTok spec guide is a useful reference point alongside this workflow mindset. It pairs well with the idea that ratio is part of packaging, not just formatting.
Aspect Ratio and Resolution Explained Simply
Think of aspect ratio as the shape of the window and resolution as the sharpness of the view through it. A 9:16 frame is tall and narrow, a 16:9 frame is wide and cinematic, and 1:1 sits in the middle as a square. The same image content can feel very different depending on which window you look through.
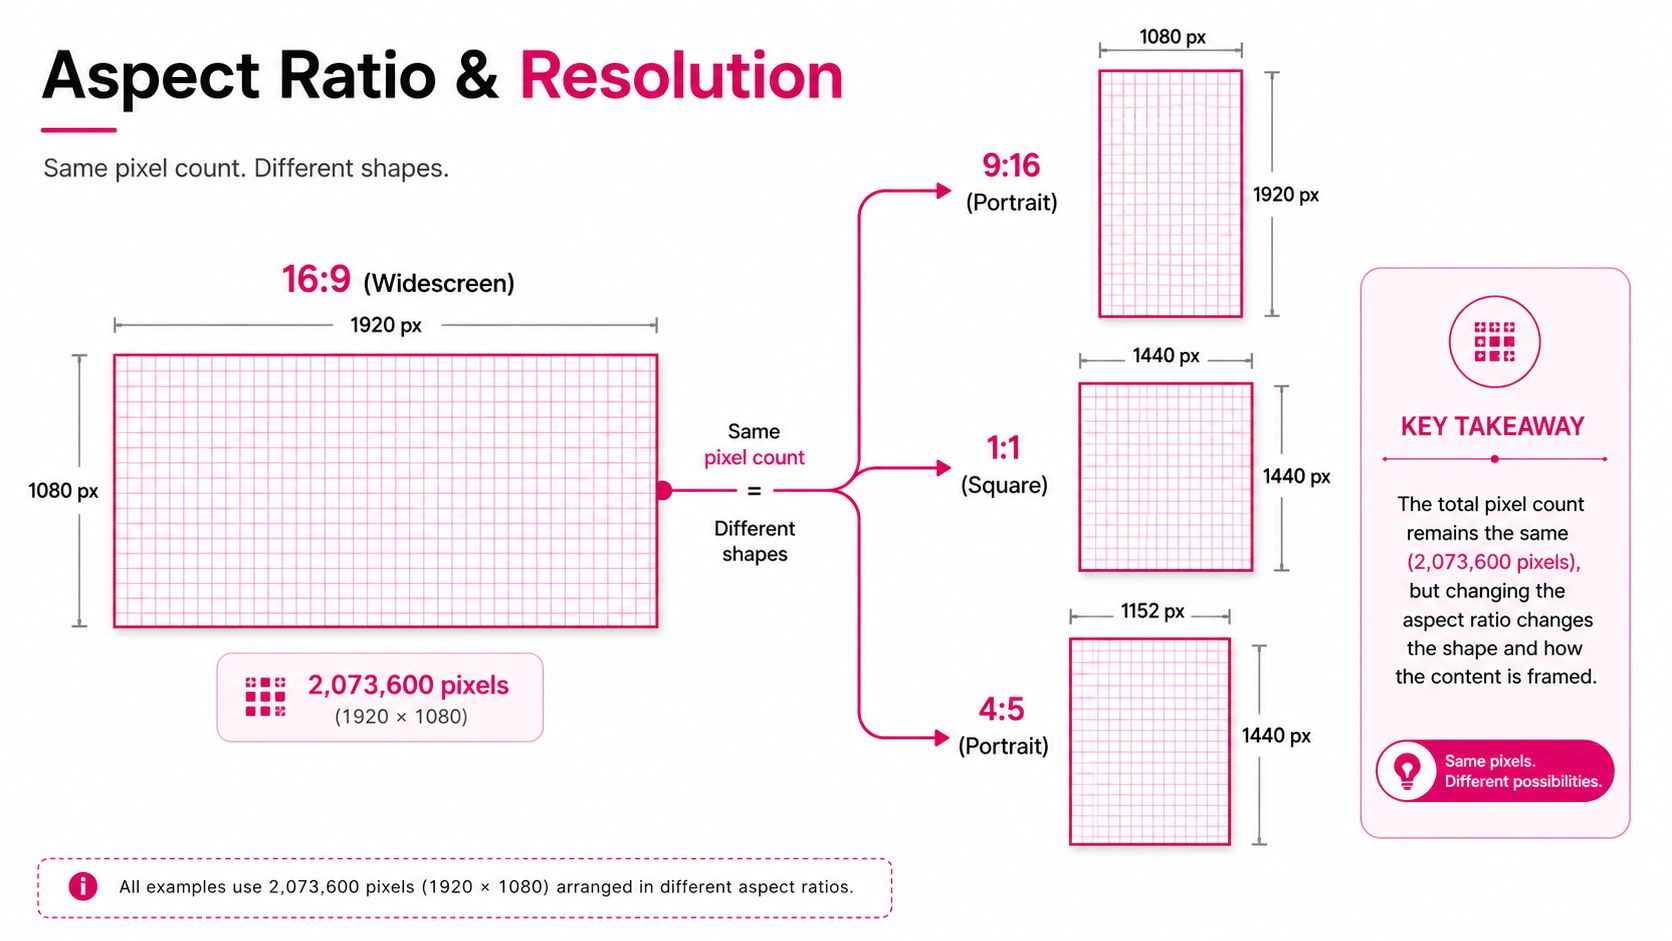
A 1080 × 1920 export gives you a vertical canvas that matches how people hold their phones. That's why the format became the baseline for short-form TikTok content, and why the same master often carries cleanly into Instagram Reels and YouTube Shorts without a full rebuild. The composition stays centered, text stays readable, and you're not fighting the app's player.
A clean delivery format matters too. A correctly formatted 9:16 file is more likely to preserve text placement, subtitles, and on-screen graphics without UI overlap when it's exported as MP4/H.264 with AAC audio. That's the practical side of resolution, the part that keeps a good cut from getting chewed up during upload.
For a wider platform sizing reference, this aspect ratio guide for all platforms is a solid companion if you're managing more than one channel. It helps when a single project needs a vertical master, a square variant, and a horizontal version from the same source.
Editing note: the file can be technically “correct” and still look wrong if the important detail sits too close to the edge of the frame.
The takeaway is simple. Aspect ratio decides what shape the audience sees. Resolution decides how much detail survives that shape. Once you keep those separate, the rest of the workflow gets easier.
Comparing 9:16, 1:1, and 16:9 for TikTok
The right TikTok ratio depends on what the clip needs to do, not on habit. 9:16 is the default for full-screen short-form. 1:1 still works when you want a square that cross-posts cleanly. 16:9 now has a place for longer horizontal uploads, especially when the content is built like a podcast clip, interview, or tutorial.
A useful external comparison is the tiktok aspect ratio guide, especially if you're deciding between formats for the same piece of footage. The practical decision usually comes down to duration and intent. Under 60 seconds, vertical remains the safe bet. Longer educational or interview content can justify horizontal delivery when the framing supports it.
TikTok Ratio Comparison at a Glance
| Aspect Ratio | Best For | Duration Sweet Spot | Upload Path |
|---|---|---|---|
| 9:16 | Native short-form, hooks, product demos, talking-head clips | Under 60 seconds | Standard mobile upload or desktop upload |
| 1:1 | Cross-posted feed content, simple branded clips, lightweight repurposing | Best for concise clips | Standard upload, often used for reuse across platforms |
| 16:9 | Podcast cuts, interviews, educational videos, longer-form repurposing | Longer than 1 minute | Mobile, Studio, or web upload depending on file size |
The upload path matters more than many editors expect. Standard mobile uploads are often capped at 287.6 MB, while higher limits such as 4 GB are available through TikTok Studio or web-based upload paths. That can influence whether a project gets compressed on the phone or handled on desktop with more control.
For long edits, 16:9 can be the cleaner choice if the content was shot that way and needs to preserve the original framing. For feed-friendly posts, 1:1 can still be useful because it carries less visual dominance than full vertical and can feel less aggressive in a mixed social calendar. But if the goal is native TikTok engagement, 9:16 still ships the cleanest.
Safe Zones, UI Overlays, and Where to Place Text
A correct ratio doesn't guarantee readability. TikTok's UI covers parts of the frame, so your job isn't just to export 9:16, it's to leave room for the interface that sits on top of it. The most workable approach is to keep critical text, logos, and calls to action inside a centered safe area, away from the edges.
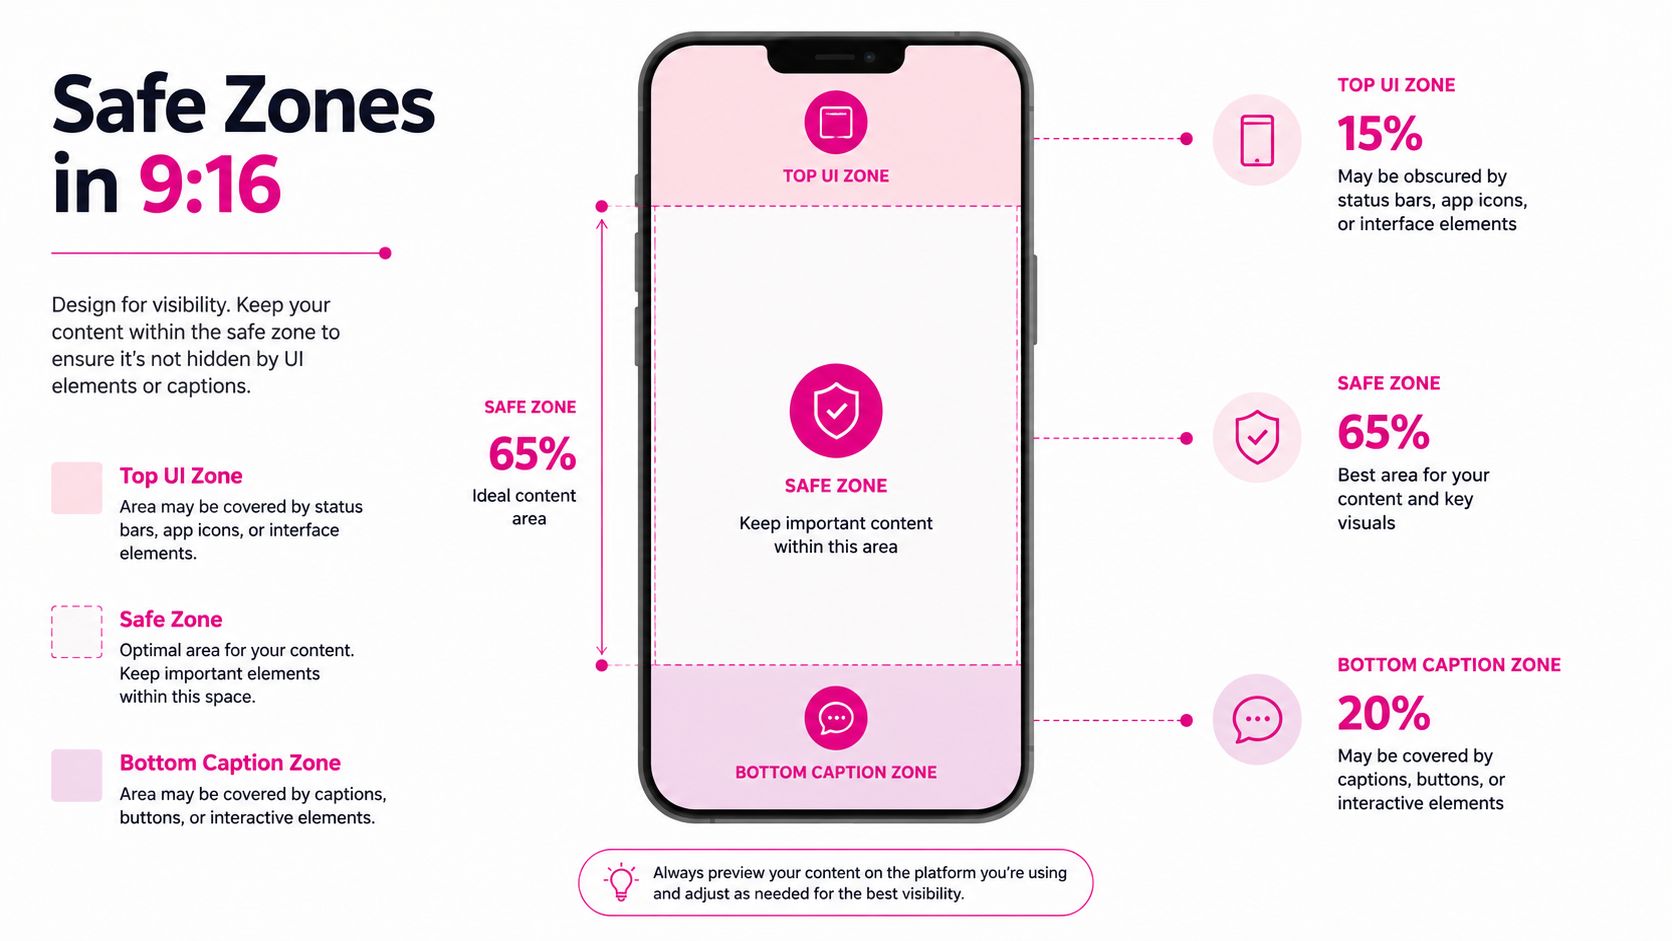
Recent 2026-era guidance from multiple creators and editors points to a central 960 × 1386 safe zone as a practical working area. That isn't a magic border, it's a discipline. It keeps your most important elements clear of usernames, buttons, captions, and the general clutter that sits around the edges of the screen.
If you're cutting story-led clips, the story-driven TikTok video guide is a helpful complement because it treats visual placement as part of retention, not just decoration. That matters on TikTok, where the first frame often carries more weight than the rest of the edit. Good placement is invisible. Bad placement is obvious immediately.
What belongs in the center
- Talking-head hooks: Keep the face high enough that the lower caption area doesn't swallow the chin or the final line of the hook.
- Product close-ups: Put the product in the middle third so the handle, price text, or CTA doesn't fight the app controls.
- Ad creatives: Keep logos and offer text away from the bottom right, where engagement and action controls tend to crowd the frame.
If you're adding captions manually, this caption workflow guide is worth keeping nearby, because captions that sit too low can look fine in the editor and then fail in the app. The same problem shows up with subtitles, logos, and CTA buttons. The ratio is right, but the placement is wrong.
Practical rule: if a viewer has to pause to read your text, the frame is already working against you.
The fix is simple. Build a habit of centering the important stuff, then treat the outer frame as protected space, not free real estate.
Export Settings Editors Actually Need
The best export preset is the one you can reuse without thinking. For most TikTok cuts, the safest pipeline is MP4/H.264 video with AAC audio, delivered in 9:16 at 1080 × 1920. That combination stays compatible, keeps file handling predictable, and reduces the chance that the app mangles your composition on upload.
If the clip is a talking-head piece, 30 fps is usually the clean default. If it's dance, sports, product motion, or fast B-roll, 60 fps gives you more motion detail before the platform compresses the file. 24 fps can work for cinematic pieces, but it's a stylistic choice, not the safest all-purpose TikTok preset.
A practical preset to save
- Frame size: 1080 × 1920
- Aspect ratio: 9:16
- Codec: H.264
- Audio: AAC
- Frame rate: 30 fps for dialogue, 60 fps for motion-heavy content
- Bitrate: Keep it high enough to hold detail, but don't assume more always means better after upload
That last point matters. TikTok will re-encode the file anyway, so the goal is not to chase an oversized export. The goal is to give the platform a clean master that doesn't fall apart during recompression. Editors waste time when they treat bitrate like a badge instead of a quality budget.
For a broader tool comparison, this best TikTok video editors guide is useful if you're deciding where to do the framing, captioning, and final export. Premiere Pro, CapCut, and DaVinci Resolve can all handle the basics, but the preset only helps if you stick to it consistently.
A good export preset is boring on purpose. It removes guesswork when the edit is already late.
If you're working with branded subtitles or lower-thirds, check the canvas before export. The best codec won't rescue a bad text layout.
Shoot in 4K, Edit in 9:16, Export for Every Platform
The strongest workflow for repurposing isn't always to shoot vertical first. In a lot of cases, it's smarter to capture in 4K and then build separate timelines for 9:16, 1:1, and 16:9 so each output keeps enough resolution after reframing. That's the move that protects quality when one source needs to feed TikTok, Reels, Shorts, and a horizontal YouTube cut.
The useful part is not the 4K label itself, it's the extra room it gives you in post. If the camera master is high enough, you can move the crop, keep the subject centered, and still avoid a soft, stretched-looking result in the final vertical export. That matters most when the subject shifts during the take or when the same clip needs multiple crops.
When this workflow pays off
- Multi-platform campaigns: One shoot can feed different aspect ratios without reshooting for each channel.
- Evergreen talking-head libraries: You can keep a single master archive and pull new cuts later without losing flexibility.
- Product shoots: Reframing becomes easier when you need tight crops for TikTok and wider crops for YouTube.
It's overkill for a one-off trend post. If the content is disposable, fast, and meant for a single platform, a native vertical shoot is usually faster and simpler. You don't need a complex reframing workflow for a clip that's likely to be replaced in a day or two.
The primary decision rule is shelf life. If the video will be reused, archived, or adapted across platforms, shoot with extra resolution and edit for each output. If it's a quick hit with a short life, native vertical capture is usually enough.
Common Ratio Mistakes and How to Fix Them
Most ratio problems show up as visual symptoms before they show up as analytics. The upload succeeds, but the clip looks soft, cramped, or awkward in the feed. Editors usually spot the mistake only after the client notices the crop.
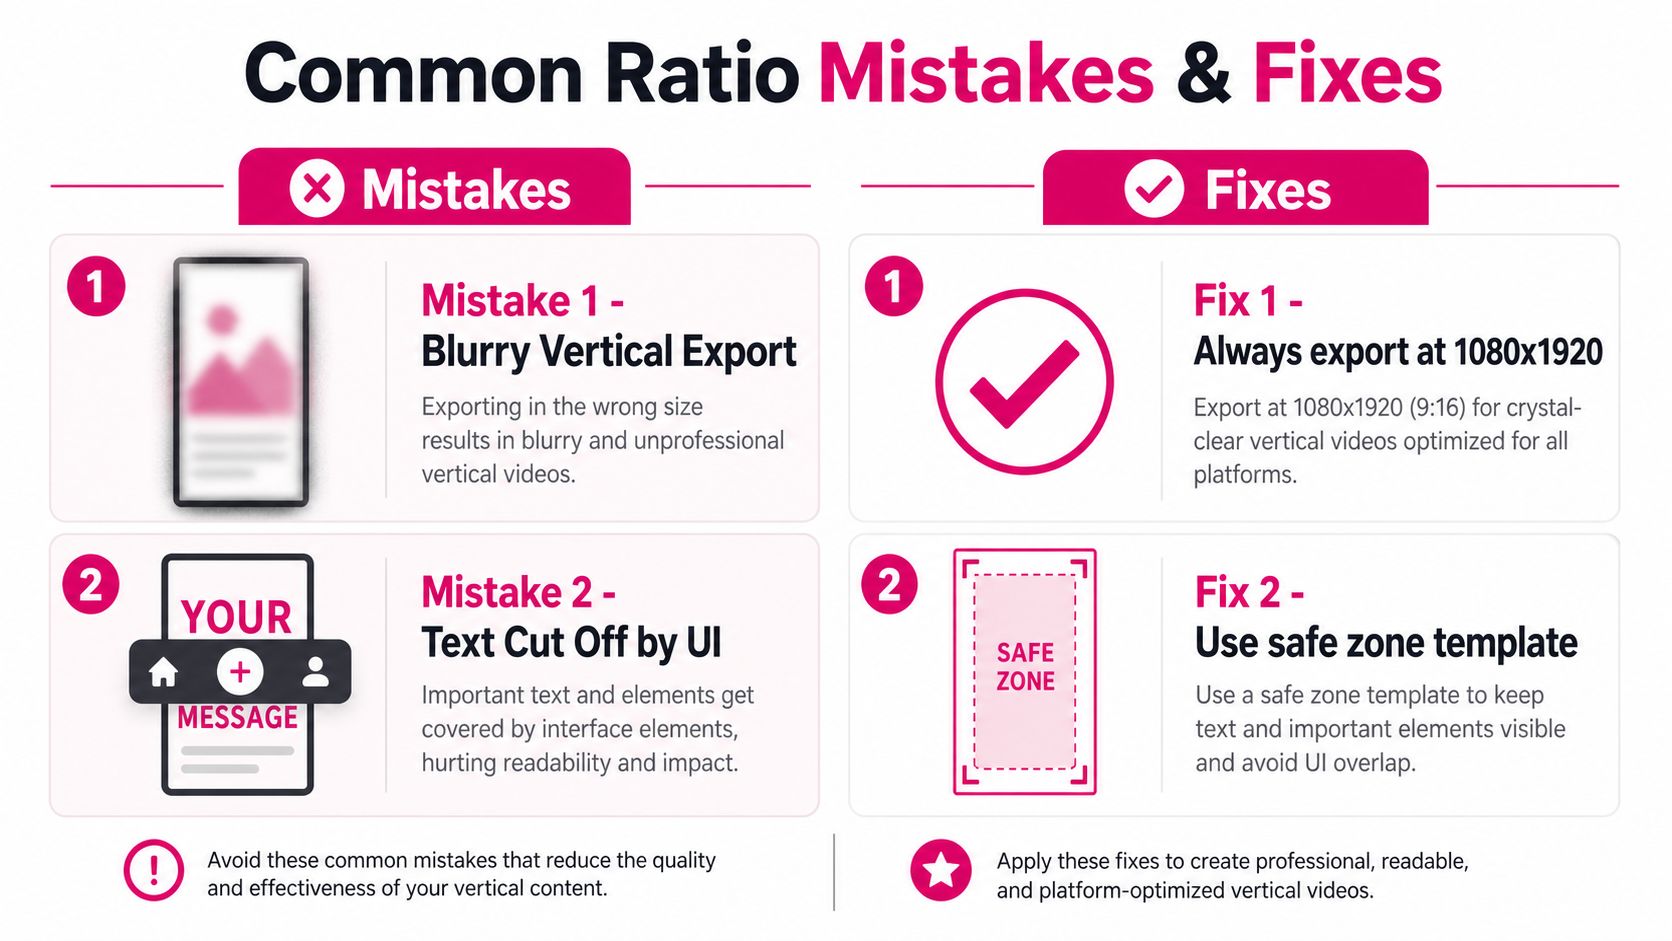
The quickest fix is to match the canvas to the intended platform before you add text or graphics. Once the titles are already on the wrong layout, every adjustment becomes slower. That's especially true when the export has to survive TikTok's compression and still look legible on a small screen.
| Visible problem | What usually caused it | One-line fix |
|---|---|---|
| Blurry vertical export | Upscaled footage or an underbuilt master | Export at 1080 × 1920 from a clean timeline |
| Text hidden behind UI | Captions or logos placed too close to the edges | Move text into the central safe zone |
| Black bars on playback | Wrong aspect ratio for the source and export | Reframe the timeline before export |
| Square clip looks boxed in | A 1:1 file was uploaded where full-screen vertical was expected | Use 9:16 for native TikTok delivery |
The last mistake is common in cross-posting. A square file may work fine on another platform, then feel underwhelming on TikTok because it doesn't fill the screen. That doesn't mean square is useless, it means the format has a different job.
Quick fix: if the frame feels too small in the app, the ratio is probably wrong for the platform, not the edit.
Quality doesn't improve just because you exported a heavier file. What matters is whether the source, the canvas, and the final destination all agree. If one of them is off, TikTok will do the rest.
Pre-Export Checklist and Final Takeaways
Before you export, run the same checklist every time. Confirm the intended ratio, check whether the clip is short-form or long-form, and make sure the subject and text sit inside the safe area. Then verify the output codec and frame rate before you send the file out.
The simplest rule is still the one that holds up best in practice. 9:16 is the default for native TikTok. 16:9 makes sense for longer horizontal clips. 4K source capture is worth it when the same footage needs to serve multiple platforms without losing framing flexibility.
If the project has brand assets, lower-thirds, subtitles, or a tight review cycle, a dedicated editor can save a lot of rework by building the canvas correctly the first time. That's less about style and more about shipping the right file on schedule.
If you want a team that can handle TikTok ratio decisions, vertical reframing, captions, and platform-specific exports without the usual back-and-forth, Your Video Editor can take that load off your plate. They build short-form cuts for TikTok, Reels, and Shorts with review workflows that keep frame placement and delivery details under control.