In a 2024 subtitle-use survey, 75% of viewers said they use subtitles because video audio is poor. That single number changes the way you should think about captioning. Captions aren't a finishing touch anymore, they're part of how people watch, understand, and stay with a video in noisy rooms, on mute, and in places where they can't turn the sound up. The subtitle-use survey also found that 29% use subtitles to avoid disturbing others and 27% say subtitles help them stay focused on what they are watching, which is why captioning has become a core publishing decision, not just an accessibility checkbox.
Table of Contents
- Why Captions Are a Core Part of Video in 2026
- Generating Your Caption File SRT vs VTT
- How to Add Captions on Major Social Platforms
- Pro-Level Timing and Styling for Readability
- Troubleshooting Common Captioning Errors
- The Smart Creator's Workflow When to Outsource Captioning
Why Captions Are a Core Part of Video in 2026
A lot of creators still treat captions like compliance paperwork. That mindset misses how people watch video now. In the same survey noted earlier, viewers named three distinct reasons for subtitles, poor audio, not disturbing others, and staying focused, which means captions solve real viewing problems in everyday settings, not just edge cases. Captions now support comprehension, public-place viewing, and concentration at the same time.
That matters because captioning is also a workflow decision. If speed is the priority, auto-captions can get you a usable draft quickly, then you clean up the obvious errors. If clarity, brand names, or technical language matter more, manual caption files give you tighter control from the start. The right choice depends on the video, the platform, and how much cleanup you can realistically handle.
Closed captions, open captions, and subtitles
The format choice changes the viewer experience. Closed captions can be turned on and off in the player, which is why they're the default choice for most upload workflows. Open captions are burned into the video itself, so viewers can't disable them, which is useful when you need the text visible everywhere a file travels. Subtitles usually refer to translated dialogue, while captions typically carry dialogue plus relevant audio cues, speaker identification, and other context.
Practical rule: if the viewer needs control, choose closed captions. If the platform can strip caption tracks or the design absolutely depends on on-screen text, open captions may make more sense.
Professional accessibility guidance also makes one thing clear, captions help more than hearing-impaired audiences. They matter when the audio is weak, when someone watches with the sound off, and when the environment makes listening difficult. That is why captions are best treated as part of the viewing experience, not a separate add-on.
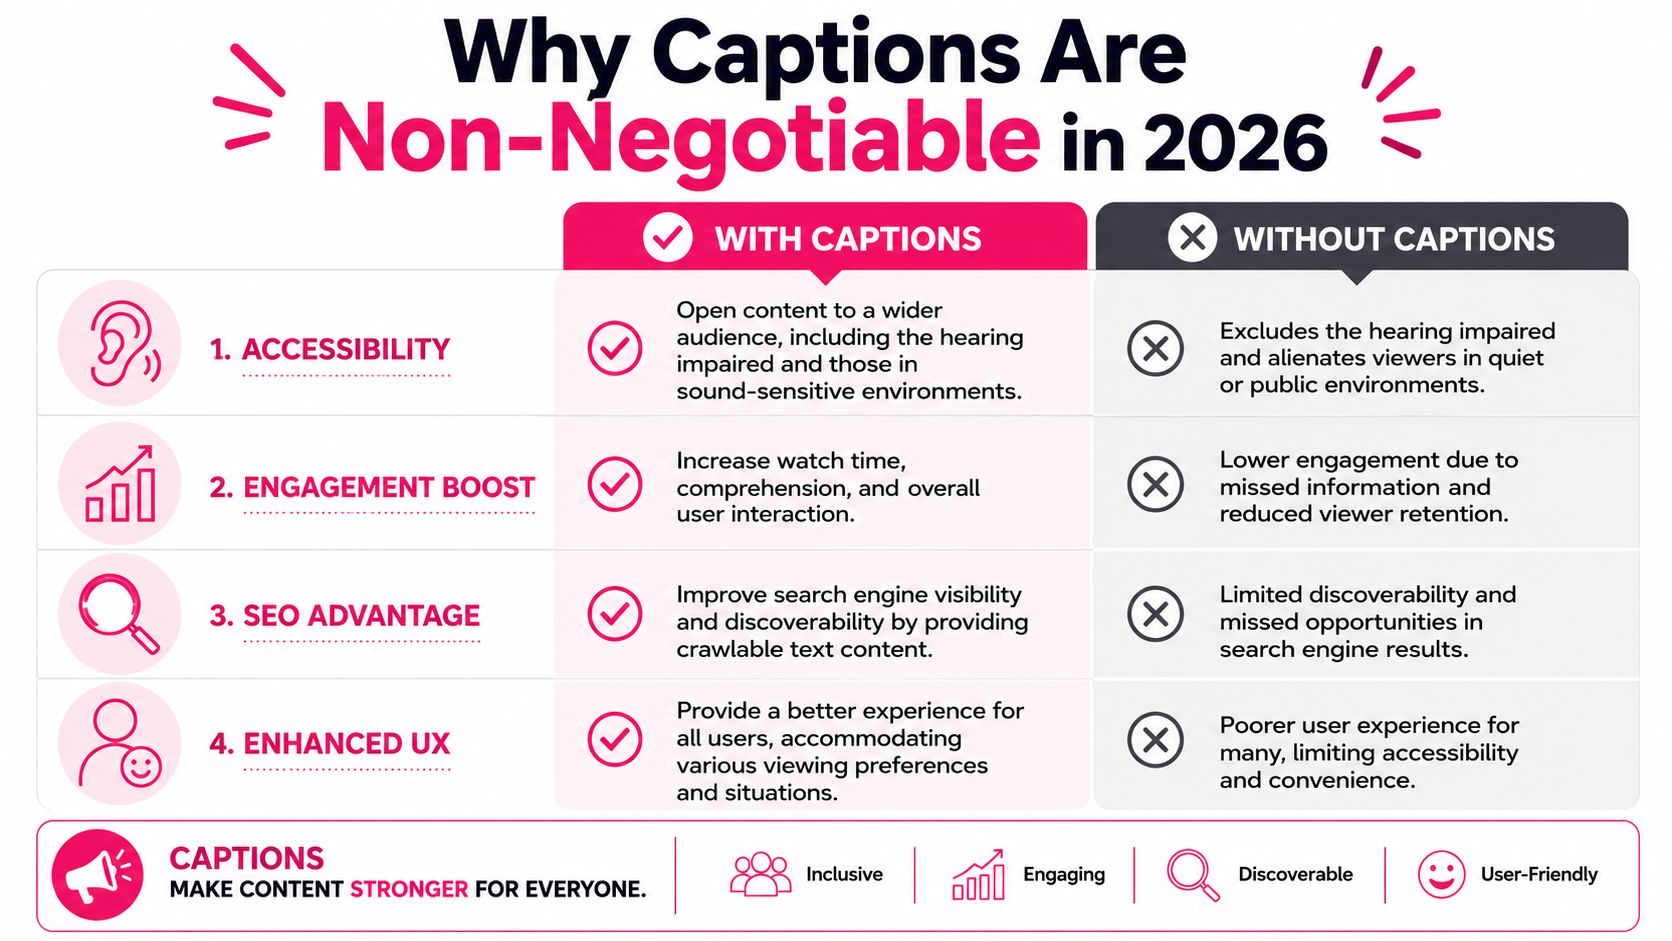
The practical takeaway is simple. If your video is meant for mobile, public viewing, or inconsistent audio, captioning has to be part of the plan. That choice affects the rest of the workflow too, including whether you move fast with auto-captions, spend the time on manual cleanup, or hand the job off to a service like video transcript examples when accuracy and turnaround matter more than doing everything yourself.
Generating Your Caption File SRT vs VTT
The first decision is not software, it's workflow. Do you already have a transcript, do you want machine-generated text to clean up, or do you need the highest possible accuracy because the content is technical, branded, or time-sensitive? Adobe Premiere now encourages starting with Automatic Transcription and then creating captions from the transcript, which fits projects where you want speed first and editing second. Adobe's caption workflow reflects the same practical split most editors use in real production.
Choosing the right file format
SRT is the workhorse format for most social and upload workflows. It's simple, portable, and widely accepted. VTT is also timed text, but it's often preferred when you need richer web-player behavior and styling support. In practice, the format choice is less important than whether the file has clean timing and readable text.
If you already have a transcript, a timed upload usually saves the most time. If the content is long or the dialogue is dense, automatic transcription can get you a working draft fast, then you can correct names, jargon, and phrasing by hand. Manual entry is slower, but it gives you the cleanest control over breaks, speaker changes, and non-speech cues.
The biggest mistake is assuming AI captions are finished captions. They're a first draft. You still need to check punctuation, spacing, timing, and any names that the system is likely to mangle.
A simple production path
A practical workflow looks like this:
- Start with the source audio. Clean audio saves time later because the transcript is easier to repair.
- Generate a transcript or upload a timed file. Use the method that matches your existing assets.
- Edit for meaning, not just transcription. Fix names, remove filler that hurts readability, and add cues where they matter.
- Export in the target format. Keep the file portable if you plan to reuse it across platforms.
- Test the file in the destination player. Timing that looks fine in an editor can still feel off in the platform UI.
If you want a practical reference for how a transcript should look before it becomes captions, this set of video transcript examples is useful because it shows the difference between raw speech and readable timed text.
The takeaway is that SRT versus VTT is only part of the decision. A key consideration is how much cleanup your project needs before the file is ready to publish. If you're working with clean spoken-word content, automation gets you close. If accuracy matters more than speed, manual review still wins.
How to Add Captions on Major Social Platforms
The upload step is where a lot of creators lose time because each platform hides caption controls in a slightly different place. You don't need to memorize every menu, you need a repeatable method. For most workflows, that means preparing a clean caption file first, then matching it to the platform's supported path.
YouTube
YouTube is the most flexible of the major platforms because it supports multiple caption paths. Purdue's YouTube guide notes that you can upload a timed file such as SRT, use auto-sync from a plain transcript, or type captions manually, but each version still needs a review pass before publishing because timing and transcription errors can slip through. Purdue's caption guide is blunt about the weak point, machine timing without human review.
For Shorts, the workflow is different enough that it helps to follow a dedicated short-form process, such as the one in how to add captions to YouTube Shorts. If you're editing in a YouTube-first workflow, the internal walkthrough at https://yourvideoeditor.com/make-youtube-short/ can also help you keep the export and upload steps aligned.
A clean YouTube process looks like this:
- Upload the caption file or transcript through the video details or subtitle area.
- Check timing in the preview player instead of trusting the editor alone.
- Fix speaker names and punctuation before making the video public.
- Confirm the final display on mobile, since that's where line breaks often feel worst.
Instagram Reels and Stories
Instagram is less forgiving about cluttered text because the frame is already crowded with UI, stickers, and overlays. That means open captions can work, but only if they're styled for mobile and kept out of the center of motion-heavy shots. If you're using burned-in text, place it where it won't fight with faces, action, or the built-in controls.
A good rule is to treat Instagram captions as a readability layer, not decoration. Keep them short, punchy, and easy to scan. If the platform gives you native caption tools, use them for speed, but still inspect the result on a phone before publishing.
TikTok
TikTok rewards captions that feel native to the pace of the app. The most common workflow is to add or generate text inside the editor, then refine placement and timing so the words don't collide with stickers, usernames, or on-screen motion. That matters more on TikTok because the visual field is busy by default.
If a clip uses fast cuts or jumps between speakers, manual cleanup is often worth the time. Automated captions are fine as a draft, but they can miss intentional pauses, names, and sound cues that help the viewer follow along. On short-form content, bad timing is more distracting than slightly simplified wording.
Facebook still benefits from caption tracks because many viewers watch with the sound off. Upload the caption file where the platform allows it, then check how the text behaves in the feed view, not just in the uploader. The same file can look polished in one surface and cramped in another.
For all four platforms, the fundamental workflow is the same. Build a clean caption file, preview it in the final player, and correct anything that feels late, crowded, or too long. The tools differ, but the quality control step doesn't.
Pro-Level Timing and Styling for Readability
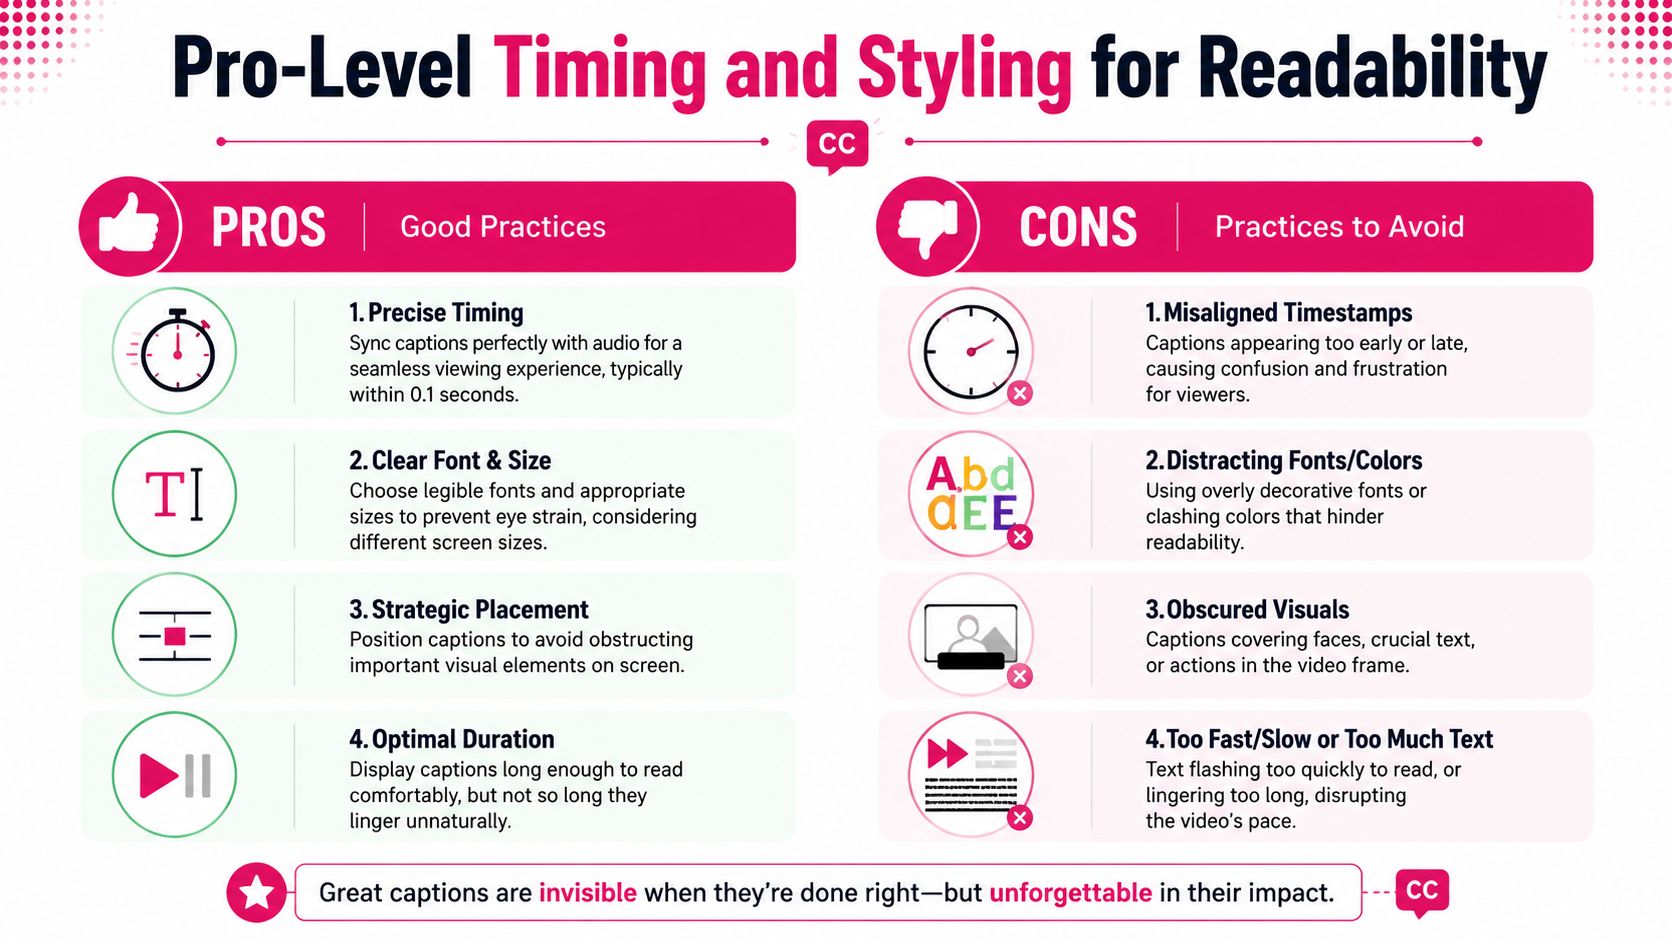
Readable captions are controlled, not flashy. The strongest rule is also the simplest, don't exceed two lines. Derek Lieu's caption guidance also recommends leaving at least 2 empty frames between captions at 24 to 30 fps, or 4 frames at 60 fps, so the viewer's eye can register a clean refresh. His guide to captions and subtitles is useful because it treats timing as a visibility problem, not a style preference.
Line breaks and timing gaps
Bad line breaks make even accurate captions feel awkward. Break lines where a natural pause happens, not only when the text fills the box. If a sentence is long, split it so the viewer can process each line without losing the speaker's meaning.
Timing matters just as much as text length. Captions should begin on or near the frame where dialogue starts, because early or late text creates a subtle lag that breaks flow. That lag becomes more obvious when the content is fast-cut or when the speaker's mouth is visible.
Captions should feel like part of the edit, not like a layer dropped on top after the cut is finished.
Styling for mobile
High contrast is essential. Light text on a soft, blurred, or busy background will fail on smaller screens, especially when the video already has graphics or movement. On short-form clips, the caption field has to survive overlays, lower-thirds, and camera motion at the same time.
A practical styling check is to watch the video on the smallest screen you can. If the caption competes with on-screen text, move it. If the font looks decorative, replace it. If the line is too long to scan comfortably, shorten it.
For editors who sync captions during the cut, the internal workflow on https://yourvideoeditor.com/how-to-sync-audio-with-video/ is a useful reference point because caption timing is much easier when the audio and cut points are already tight.
The professional standard is simple. Keep captions short, visible, and out of the way of essential visuals. Anything else may look creative inside an editor, but it usually reads as clutter on a phone.
Troubleshooting Common Captioning Errors
Most caption problems come from three places, timing drift, transcription mistakes, and editorial choices that were skipped too early. When captions slowly move out of sync, the usual cause is a mismatch between the file timing and the final export, or a change in the edit after the captions were generated. When text looks wrong, the issue is usually transcription, not the file type itself.
Fixing sync drift and bad text
If captions start right but drift later, rebuild the file against the final picture lock. Don't patch the first few errors and hope the rest will hold. Once the edit changes, every timing reference below it can move.
Garbled characters usually point to export or encoding issues. Re-export the caption file from the source editor, then test it in the destination platform before publishing. If the same line appears broken across multiple players, the source text itself may need cleanup.
Correcting auto-caption mistakes
Auto-captions often struggle with names, jargon, and overlapping speech. They also tend to ignore the editorial layer that makes captions usable, including speaker labels, sound effects, and meaningful non-speech cues like [applause] or [thunder]. YouTube's guidance makes clear that captioning is not just transcription, it's a review process where human correction still matters. YouTube's caption guidance treats those cues as part of the work, not optional extras.
A simple repair checklist helps:
- Check speaker names when the audio includes interviews, panels, or multiple voices.
- Add non-speech cues when sound changes the meaning of a moment.
- Trim overlong lines that wrap badly on mobile.
- Re-test after every correction so one fix doesn't create another display issue.
The fastest fix is often a manual review pass rather than a full rebuild. Most caption failures don't need a new tool. They need a sharper pass on the file you already have.
The Smart Creator's Workflow When to Outsource Captioning
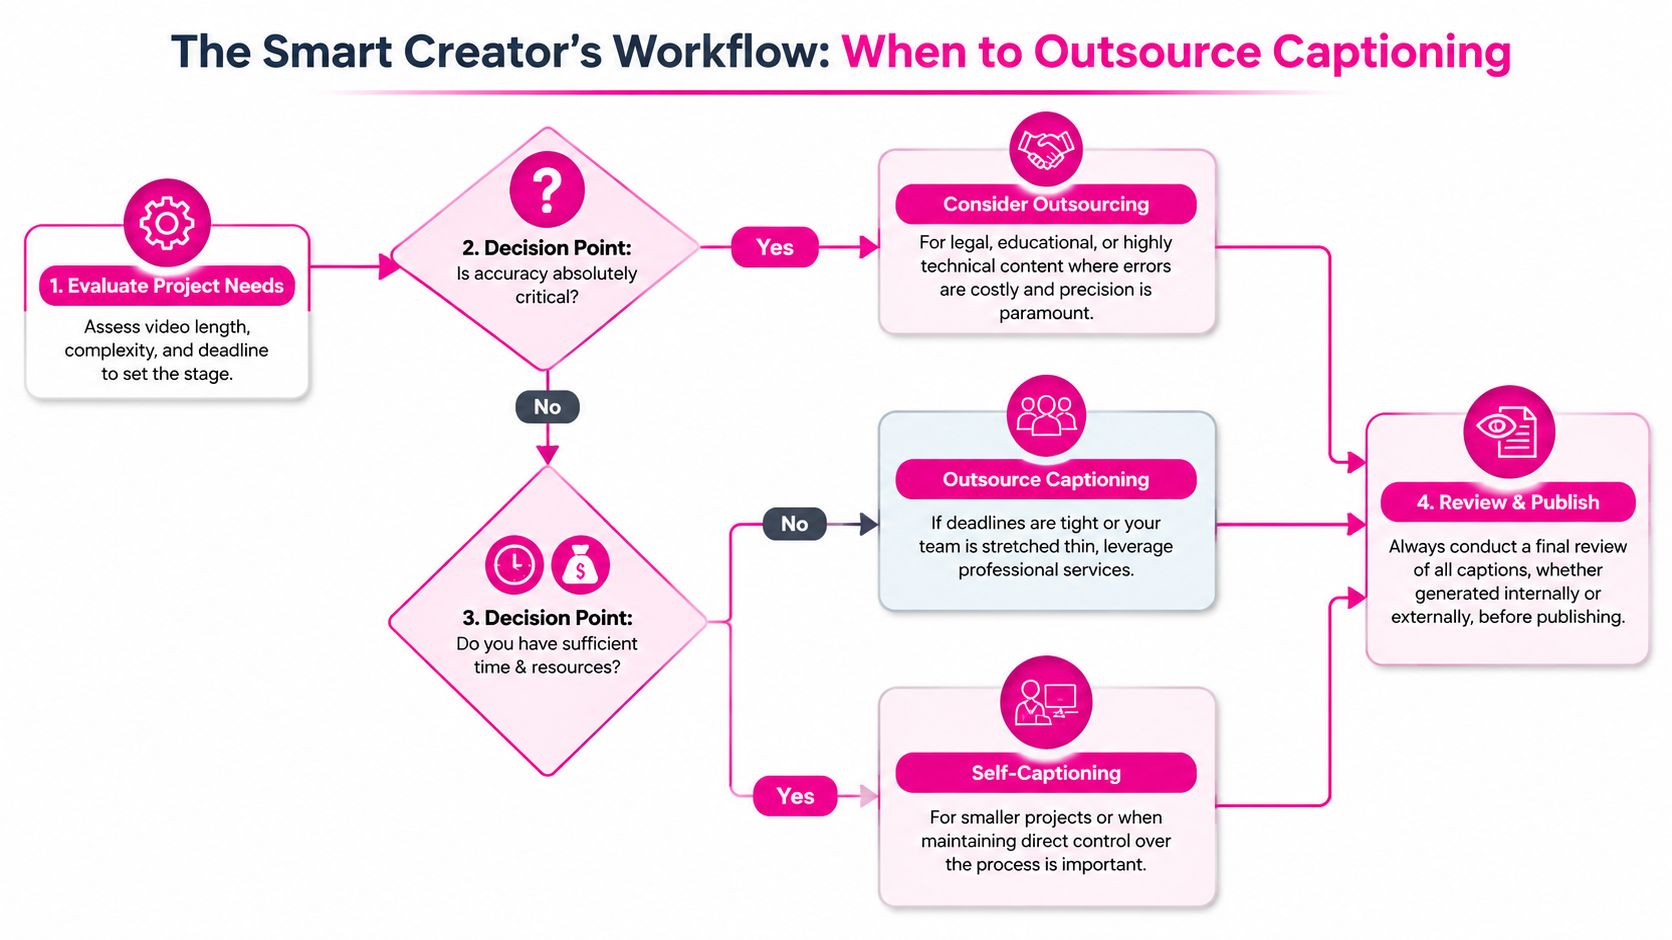
Captioning becomes expensive in time before it becomes expensive in money. That's the hidden cost most creators underestimate. A video that needs careful cleanup, brand-consistent styling, and multiple platform exports can turn captioning into a recurring bottleneck, especially when the team is publishing on a schedule and can't afford to stop for a manual correction pass.
When DIY still makes sense
DIY works best when the content is short, the speaker is clear, and the captions don't need heavy styling. It also makes sense when you're still experimenting with your channel voice and want full control over every line break and on-screen placement.
If the video is a one-off update or a quick social post, self-captioning is usually fine. You can move fast, keep costs low, and make changes on the spot. The tradeoff is that the final review still takes attention, and that's where many creators lose momentum.
When outsourcing is the better move
Outsourcing makes more sense when accuracy matters, when the content is technical or educational, or when the same style has to hold across a lot of uploads. It also makes sense when your bottleneck is not ideas, but execution. If captions are delaying publication or forcing someone on your team to do repetitive cleanup, handing the work off can protect both quality and cadence.
A Discovery Digital Networks case study found that closed-captioned YouTube videos received 40% more views than versions without captions, and the average lifetime view increase was 7.32%. REV's summary of the study shows why quality captions are worth treating as part of the publication process, not a cosmetic add-on.
For creators who want that work handled inside a structured editing workflow, hire a video editor when the goal is to keep captioning consistent without turning it into an internal time sink.
The smartest decision is not always the cheapest one. It's the one that keeps your publishing schedule intact, preserves accuracy, and lets you spend your time on the work only you can do.
A CTA for Your Video Editor.