You've filmed the video. The camera card is full, your desktop has a folder called “final_v2_use_this_one,” and now you're staring at clips that don't yet feel like a YouTube video.
That's the part new creators underestimate. Shooting feels productive. Editing decides whether people keep watching.
If you want to learn how to edit videos for YouTube, think less about software tricks and more about building a repeatable workflow. Good editing isn't random. It starts with organized files, moves through story and pacing, then gets finished with sound, color, graphics, and a clean upload process. Once that system is in place, every video gets faster to make and easier to improve.
Table of Contents
- From Raw Footage to Published Video
- Building Your Editing Foundation
- Crafting the Narrative with Cuts and Pacing
- Polishing Your Video with Audio and Color
- Adding Visual Interest with Graphics and B-Roll
- Exporting Uploading and Repurposing Content
- When to Stop Editing and Hire a Professional
From Raw Footage to Published Video
Most editing problems don't start on the timeline. They start earlier, when footage is messy, takes aren't labeled, and there's no clear process for turning raw material into a finished episode.
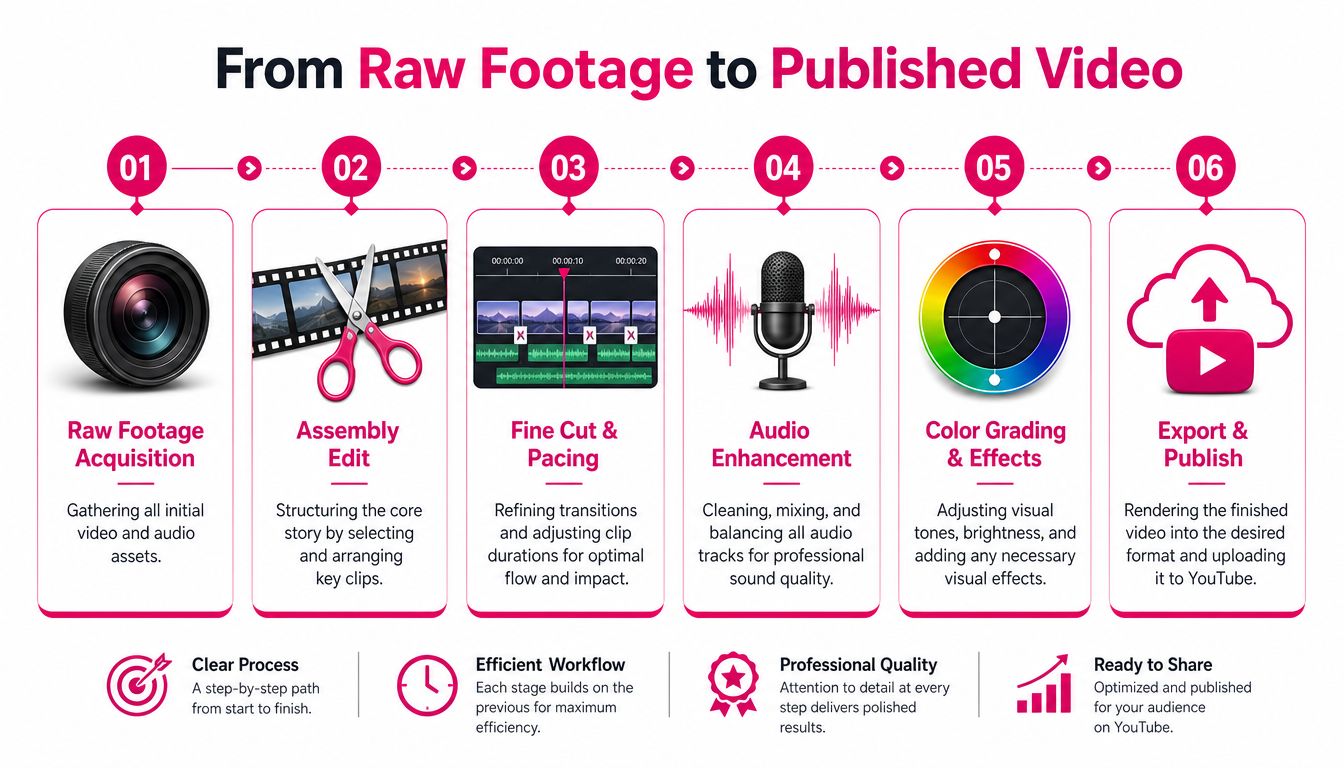
A practical YouTube workflow has a few distinct phases. First, gather and sort everything. Then build a rough cut that only cares about structure. After that, tighten pacing, clean the audio, polish the visuals, and export with settings YouTube handles well. If you skip steps, you usually pay for it later with rework.
The workflow that keeps editing sane
Here's the sequence that works for most creators:
- Ingest the footage and confirm every camera, mic, screen recording, and asset is present.
- Build the assembly edit by placing the usable takes in order without worrying about polish yet.
- Refine pacing by cutting pauses, weak phrasing, duplicate ideas, and dead space.
- Fix the sound so dialogue is clear and music supports instead of competes.
- Correct and grade the image so shots feel consistent from start to finish.
- Export and publish with metadata, thumbnail, and any repurposed short clips ready to go.
That order matters. New editors often try to animate titles before the core story works. That's backward. A flashy lower third won't save a slow opening.
Practical rule: Edit for comprehension first, then retention, then polish.
If your footage currently feels chaotic, that's normal. The shift happens when you stop treating editing as one giant task and start treating it as a chain of smaller decisions. That's when the process becomes repeatable instead of stressful.
Building Your Editing Foundation
Professional editing starts with boring habits. Those habits are the reason pros lose fewer files, spend less time hunting for clips, and avoid timelines that fall apart halfway through the job.
The biggest one is backup discipline. To prevent data loss, professionals follow the 3-2-1 rule: make three copies of your project, store them on two separate types of media, with one copy kept off-site for resilience, as noted in this discussion of practical YouTube editing habits.
Use a folder structure you never have to think about
Create the same structure for every project. Don't reinvent it every time.
A simple version looks like this:
- 01 Footage
- A Cam
- B Cam
- Screen Recordings
- 02 Audio
- Lav Mic
- Boom Mic
- Music
- Sound Effects
- 03 Graphics
- Logos
- Lower Thirds
- Thumbnails
- 04 Project Files
- Premiere Pro / Final Cut Pro / DaVinci Resolve
- 05 Exports
- Review Drafts
- Final Upload
- Shorts
- 06 Archive
- Old versions
- Delivered files
Name files clearly. “Interview_take_03_good_answer” beats “clip00087” every time.
Proxies save your momentum
If you're editing high-resolution footage on a machine that struggles, make proxies. These are lighter copies of your video files that play smoothly during editing while still linking back to the original high-quality footage for export.
That matters more than people think. Lag changes how you cut. When playback stutters, you stop trusting your timing and start making lazy decisions just to move on.
A few situations where proxies help immediately:
- 4K talking-head footage: Your editor can scrub and preview without choking on full-resolution files.
- Multi-cam timelines: Angle switching becomes usable instead of frustrating.
- Long-form content: Webinars, interviews, and courses stay responsive even when the timeline gets heavy.
If you're still comparing tools, this guide to professional video editing software options is a useful starting point.
The editors who look fast usually aren't rushing. They've removed friction before they ever make the first cut.
Crafting the Narrative with Cuts and Pacing
Here, the true editing work begins.
Once the footage is organized, the job is no longer “put clips on a timeline.” The job is deciding what deserves to stay. Most weak YouTube videos aren't poorly shot. They're merely left too loose.
Data from Mailchimp notes that the average YouTube video is viewed for only 50% to 60% of its total length, which is why cutting filler, pauses, and redundant material matters so much for watch time in its guide to editing YouTube videos.
Start with the assembly, not perfection
On the first pass, don't worry about transitions, sound design, or zoom effects. Just answer three questions:
- What is the opening promise?
- What information or story beats must stay?
- What can disappear without hurting clarity?
This pass is often uglier than people expect. That's fine. A rough edit should feel functional, not beautiful.
A good assembly cut usually means:
- The strongest hook appears early.
- Repeated points are removed.
- Tangents are gone, even if they were fun to record.
- Every section earns its place.
The jump cut paradox
Jump cuts work. They remove hesitation and give talking-head videos energy.
But aggressive cutting has a cost. In longer videos, too many obvious jumps can make the edit feel nervous. The viewer stops following the idea and starts noticing the edit itself. That's useful in comedy, commentary, or deliberately fast content. It's less useful in interviews, tutorials, or anything that needs trust and flow.
A better question isn't “Should I use jump cuts?” It's “What kind of cut serves this moment?”
Use a jump cut when:
- the speaker rambled,
- a filler phrase slows the point,
- the energy needs a lift.
Use B-roll or a cutaway when:
- the visual jump feels harsh,
- you're explaining a process,
- you want to hide a trim without breaking immersion.
Use a different camera angle when:
- the point is important,
- you want emphasis without visual chaos,
- you're cutting between separate takes of the same idea.
If the viewer notices every cut, the edit is probably working too hard.
Choose takes by intent, not only continuity
This matters most in interviews, courses, webinars, and multi-cam setups. A new editor often picks the take with the cleanest hand position or the closest eyeline match. A better editor picks the take where the speaker sounds most convincing.
That means watching footage for performance cues:
- Eye contact: Which take feels direct and confident?
- Micro-expression: Did one version land with more warmth or conviction?
- Tone shift: Which read sounds like the speaker means it?
If you recorded multiple angles by yourself, pick a hero take first. Build the scene around the strongest performance. Then use alternate angles and B-roll to smooth the edit. That approach protects the emotional core of the footage instead of sacrificing it for technical neatness.
Tight pacing doesn't mean constant speed
Many beginners confuse fast with engaging. They aren't the same.
Good pacing has contrast. A quick montage hits harder after a brief pause. A serious point lands better if you let one sentence breathe. If every moment is trimmed to maximum speed, nothing feels important.
That's the rhythm you're trying to develop when learning how to edit videos for YouTube. Not faster cuts. Better judgment.
Polishing Your Video with Audio and Color
People will tolerate an imperfect shot for a while. They won't stay long with distracting sound.
A common editing mistake is neglecting audio quality. Clear sound from an external microphone improves viewer experience more than visual effects, as noted earlier in the source on editing fundamentals.
Audio first means dialogue first
If the viewer has to strain to understand the speaker, everything else loses value. Start by making speech clean, stable, and easy to follow.
In practical terms, that usually means:
- Reduce obvious background noise if your software has noise reduction tools.
- Cut room hum and handling sounds where possible.
- Level out dialogue so some phrases don't disappear while others spike.
- Lower music under speech instead of making the voice compete with the track.
Music should support the mood, not ask for attention. If your intro music sounds great solo but fights the first sentence, the music loses.
For creators recording narration separately, this walkthrough on video editing with voice-over covers a clean workflow for syncing spoken audio with visuals.
Editing note: If you can only improve one thing this week, improve the sound.
Bad audio shows up in familiar ways
You can usually hear the problem before you identify it. Common issues include:
| Problem | What it sounds like | Typical fix |
|---|---|---|
| Room echo | Hollow, distant speech | Record closer to the mic, reduce reverb where possible |
| Music too loud | Dialogue feels buried | Pull music down and automate around key lines |
| Uneven levels | Quiet and loud phrases swing wildly | Normalize or manually level speech |
| Background noise | Hum, hiss, traffic, fan noise | Use cleaner recording practices and light cleanup |
Video can still look acceptable with small exposure mistakes. Audio rarely gets that grace.
Here's a practical demonstration worth watching before you overcomplicate your sound chain:
Color correction and color grading are not the same
These terms get mixed together, but they solve different problems.
Color correction fixes footage so it looks natural and consistent. If one shot is too blue, another is too dark, and a third is oversaturated, correction gets them into the same believable world.
Color grading adds style after correction. That's where you shape mood, brand feel, or atmosphere.
Think of it this way:
- Correction is making the white shirt look white again.
- Grading is deciding whether the whole scene should feel warm, cool, clean, moody, or punchy.
A simple color workflow works better than chasing cinematic looks
New editors often jump straight to LUTs and dramatic grades. That usually makes footage look worse, not better.
A safer order is:
- Fix exposure so skin tones and important details are visible.
- Adjust white balance so shots don't drift warm and cool for no reason.
- Match shots from the same scene.
- Add a light grade only after the image is stable.
If your channel has a recognizable look, build it subtly. Consistency beats intensity. Viewers should feel the polish without being distracted by it.
Adding Visual Interest with Graphics and B-Roll
A clean cut gets the message across. B-roll and graphics help the viewer absorb it.
Say you're explaining how you set up a home studio. You could leave the camera on your face the whole time and keep trimming jump cuts. Or you could show the desk, the mic placement, the light angle, and a screen recording of your settings. The second version feels clearer because the viewer doesn't have to imagine the process.
B-roll fixes more than visual boredom
B-roll is often treated like decoration. It's more useful than that.
It can:
- Cover awkward edits when you remove a section from a talking-head take.
- Clarify abstract points by showing the thing being discussed.
- Reset attention when the main camera angle has gone static for too long.
- Add tone through environment shots, details, or process clips.
A tutorial becomes easier to follow when viewers see exactly what changed. A vlog feels more immersive when the cutaway footage carries the scene instead of just filling time.
Good B-roll doesn't interrupt the story. It carries part of the story for you.
Graphics should guide, not decorate
The most useful on-screen graphics are usually the simplest ones.
A lower third can identify a speaker. A short animated text callout can reinforce a key term. A progress marker can help the viewer understand where they are in a longer lesson. These elements help orientation. They don't need to spin, bounce, or explode onto the screen to be effective.
Use graphics when they answer a question the viewer might have:
- Who is this person?
- What tool is on screen?
- What's the key phrase I should remember?
- Which step are we on?
If a motion graphic exists only because the timeline feels empty, cut it.
Your thumbnail starts during editing
The thumbnail is not the final chore after export. It's part of the editorial process because it defines the promise of the video.
While editing, flag frames with strong expression, clean composition, or a visually obvious moment of tension. Those are often better thumbnail candidates than random screenshots grabbed after upload.
A strong thumbnail usually does three things well:
- Shows a clear subject
- Creates curiosity without confusion
- Matches the actual value of the video
That last point matters. If the thumbnail promises a dramatic reveal and the edit delivers a calm tutorial, viewers feel misled. Better clicks come from alignment, not exaggeration.
Exporting Uploading and Repurposing Content
A good edit can still look rough after upload if the export settings are careless. At this stage, many creators lose quality at the last step.
The basics are straightforward. Use YouTube-friendly specs, export at the resolution and frame rate your footage was edited in, and avoid changing technical settings just because you saw someone recommend them in a forum. Practical advice from editors also stresses matching platform specs such as 1920×1080 at 24fps, H.264 format, and a 10 to 15 Mbps video bitrate when appropriate, while using simple SEO-friendly filenames and descriptions naturally.
Recommended YouTube export settings
| Setting | Recommendation for 1080p | Recommendation for 4K |
|---|---|---|
| Resolution | 1920×1080 | 3840×2160 |
| Format | H.264 | H.264 |
| Frame rate | Match source footage | Match source footage |
| Video bitrate | 10 to 15 Mbps | Higher than 1080p export, matched appropriately in your editor |
| Audio | AAC, clean stereo export | AAC, clean stereo export |
A few checks before you hit render:
- Watch the full timeline once for typos, bad cuts, and audio glitches.
- Confirm graphics are inside safe areas and not crowding the edges.
- Check your intro and ending for dead black frames or clipped audio tails.
- Name the export clearly so you don't upload the wrong version.
For the publishing side, this YouTube upload checklist is handy for making sure the technical work and metadata are aligned.
Repurpose the long video while the edit is fresh
A finished long-form video contains raw material for short-form clips. Pull those clips while the main edit is still open. Don't wait until weeks later when you have to rediscover the strongest moments.
According to SellersCommerce, 73% of viewers believe videos between 30 seconds and 2 minutes are the most effective, which makes repurposing into short clips especially valuable for discovery on platforms that reward concise video formats.
Look for micro-moments such as:
- a sharp one-sentence takeaway,
- a surprising reaction,
- a quick before-and-after,
- a single tactic that works as a standalone tip.
Chapters and metadata help the edit do its job
For longer videos, structure still matters after upload. Chapters make a long video easier to move through when someone wants one answer instead of a full watch from the top.
If you use chapters, keep the timestamps in ascending order, start at 00:00, and include at least three entries with each chapter lasting a minimum of 10 seconds, as described in the same SellersCommerce reference above. Keep titles concise, use relevant keywords naturally in the description, and write metadata like a human, not like a search engine prompt.
A polished upload feels intentional from thumbnail to final timestamp.
When to Stop Editing and Hire a Professional
Learning to edit your own videos is worth it. It teaches pacing, sharpens your instincts, and makes you better at filming because you start noticing what creates problems later.
But there's a point where editing everything yourself stops being an advantage and starts becoming drag.
That usually happens when the channel grows, the content gets more ambitious, or your schedule starts slipping because every upload eats days of technical work. If editing keeps you from scripting, recording, collaborating, or publishing consistently, DIY stops being the efficient choice.
Signs you've hit the DIY ceiling
A lot of creators wait too long to admit this. They assume outsourcing is only for large channels. It isn't. It's for anyone whose time is worth protecting.
You're probably at the handoff point if:
- Publishing is late more often than it's on time
- You avoid recording because you dread the edit
- Your video ideas are getting simpler just to stay manageable
- Feedback loops are messy, with notes scattered across email, chat, and screenshots
- You know what good editing looks like, but you no longer have the hours to execute it well
That doesn't mean you failed at editing. It means the channel needs a different operating model.
Outsourcing works best when you already know your taste, your pacing, and your standards.
What to prepare before handing off your videos
An editor can work faster and better when the creator sends clean inputs. Before you outsource, prepare:
- A clear folder structure with footage, audio, graphics, and brand assets separated.
- A creative brief that explains audience, tone, references, and what the video needs to achieve.
- Examples of your preferred style so pacing and visual choices don't start from guesswork.
- Notes on recurring preferences such as subtitle style, music taste, hook length, and how aggressive cuts should be.
If you've never worked with an editor before, expect a short calibration period. The first videos are about alignment as much as execution.
What a professional workflow should look like
The right service doesn't just promise editing skill. It reduces operational friction.
A useful setup usually includes:
- a predictable turnaround,
- one place to upload files,
- timestamped feedback,
- clear revision handling,
- consistency across long-form and short-form content.
If you're comparing options, pay attention to process, not only the sample reel. Great-looking edits matter, but so do communication, revision structure, and whether the team can maintain your output over time.
For creators scaling beyond solo production, a service model with long-form editing, short-form derivatives, thumbnails, motion graphics, audio cleanup, multi-cam support, and tracked feedback can remove a lot of hidden workload. It also keeps your energy focused on the work only you can do, which is making the content worth watching in the first place.
Editing skill still matters even if you outsource
You don't need to keep cutting every frame yourself, but you should keep your editorial judgment.
That means knowing:
- where your hooks usually fail,
- how much pacing is too aggressive,
- what kind of B-roll feels on-brand,
- which moments are worth turning into Shorts,
- when a polished edit still misses the emotional point.
Creators who understand those things give better notes, hire better editors, and get better results.
If editing is taking too much time or your channel needs a more scalable workflow, Your Video Editor can help with long-form YouTube edits, Shorts, thumbnails, graphics, and review workflows built for creators who need consistent output without losing control of their style.